Painting Fundamentals
You’ve assembled your core toolkit, you’ve primed some models, now you’re ready to paint them. As you put brush to paint there are some fundamentals to think about. Making them part of your regular routine will help you become a better painter in a shorter time.
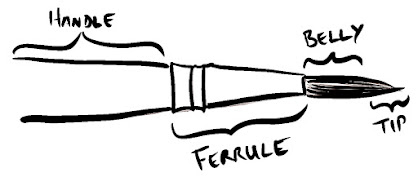
The diagram below provides the names of the main parts of the paintbrush.
 |
| Diagram of the main anatomy of a paint brush |
Putting paint on the palette
Firstly and importantly, give the paint a good shake. Paint separates over time with the pigment falling to the bottom. Whenever you use a paint that’s been sitting more than a few hours, give it a really good shake to mix the pigment and medium together again.
Once shaken, if you’re using paint with dropper bottles, you simply squeeze a drop directly onto the palette. If however you’re working with flip top pots, you’ll need to use a brush to transfer paint to the palette. Transferring paint is an easy way to unintentionally damage brushes, so use a rough brush. If you don’t yet have some spare rough brushes around, use your largest brush. This brush is normally reserved for rougher painting work like basecoats and all over washes so if it gets messed up a little it’s not such a big deal.
Thinning the paint
Most paints are thicker from their bottle or pot than is suitable to apply directly to the model. You’ll likely want to thin the paint a bit. The exact thickness is somewhat personal preference, as long as it’s thin enough to apply smoothly. If the paint isn’t thinned down enough, your brush marks can become preserved in the dried paint.
Water is entirely sufficient for thinning when you’re getting started. When you have some paint on the palette, don’t try and thin it all at once. Thin a little bit, use it, thin some more, and so on. This enables you to adjust the thickness as you go.
Thin the paint by getting your brush wet, and mixing the water in the brush, with a little bit of paint on your palette. Many people describe well thinned paint as having the consistency of milk. In my opinion, these people do not drink milk. The paint should be thin enough that it doesn’t leave visible texture in your brush strokes and should provide complete coverage in 2-3 coats. Thinning paint further than this has its place in more advanced techniques
Loading paint from palette to brush
Once your paint is thinned you’re ready to load it onto your brush. You’ll likely use the same brush to thin the paint, and apply it to your model. To preserve the life of your brushes, it’s important to keep the paint away from the ferrule, the metal part of the brush that hold the bristles and attaches them to the handle. Remember, you can always apply more paint, but it’s much more difficult to recover from applying too much, so don’t feel the need to load lots of paint on your brush.
If paint reaches the ferrule, and you will make this mistake at some point, we all do, wash the brush thoroughly as soon as you realize. If paint is allowed to dry in the ferrule it may not immediately destroy the brush, but over time more and more paint will collect. This eventually impacts the ability of the brush to form a point.
Putting paint to model
You have paint on your brush and it’s not in the ferrule. Congrats! You’re ready to actually put some paint on the model. Try and brace the heels of your hands together and rest your elbows on something; arms of chair, table, something that will stabilize your forearms. It’s extremely hard to keep our hands stationary, which affects our ability to precisely apply paint. By creating a point of contact between our hands we cause any movement in one hand to be transferred to the other. This keeps our hands stationary relative to each other. By further resting your elbows on something firm, you help isolate your forearms from movements in the rest of your body.
As you paint the model, avoid brushing over the same area multiple times in quick succession. Brush over an area once or twice then move on. If the paint isn’t as opaque as you want it to be, come back once the first layer has dried. A common mistake is attempting to get full opacity by going over the area again and again without letting each layer fully dry. This causes partially dried paint to get pulled up and can create a gritty texture on the surface.
As the paint flows off the brush, it naturally leaves the larges accumulation of pigment at the end of the stroke. This means where your stroke ends will have the most colour. If you’re painting a lighter colour over a darker colour, draw the brush from where you want the colour to be darkest, to where you want it to be lightest. Conversely, painting a darker colour over a lighter colour, draw the brush from the area you want to remain lighter, to the area you want to be the darkest.
Letting it dry
I get it, you’re excited and want to keep painting. Sometimes though, you really do have to let the paint you’ve already applied dry completely. This is especially the case with washes, inks, or contrast paints. They’re thinner and take longer to dry than regular acrylic paints. Be patient and let that happen.
If you want to speed up the process, a warm hairdryer or heat gun can help. I personally find it better to be working on a few models at once so there’s always something else to work on while a model is drying.


Comments
Post a Comment